Как вернуть ноутбуку Acer Aspire заводские настройки, если встроенная производителем программа восстановления Acer Recovery Management не работает
и она мне пишет ошибку: «Некоторые файлы отсутствуют. Их можно найти на установочном носителе или носителе для восстановления системы». Но никакого носителя я специально не создавал и у меня его нет. Скрытые разделы на ноутбуке не удалял. Что можно сделать в моей ситуации?
Как вернуть ноутбуку Acer Aspire заводские настройки, если встроенная производителем программа восстановления Acer Recovery Management не работает
Жмём ОК. Теперь наша флешка будет доступна в Windows 8.1 установленной на виртуальную машину
Программа скачивается в архиве, разархивируем её прямо на рабочий стол и идём на сайт
Жмём Free Download
скачиваем и устанавливаем AOMEI PE Builder 1.4 .
После установки запускаем программу и создаём загрузочную флешку, при создании интегрируем в неё программу WinNTSetup3.
Выбираем Add files
Создаем папку WinNTSetup3, далее нажимаем Add file
В открывшемся проводнике находим папку с утилитой WinNTSetup и поочередно выбираем файлы WinNTSetup_x64 и WinNTSetup_x86
После добавления файлов выбираем Add folder
Опять идём в папку WinNTSetup3 и поочередно добавляем папки Lang и Tools
Получается следующее. Жмём ОК.
Cоздаём загрузочную флешку, выбираем пункт USB Boot Device и жмём Next.
Все данные на флешке удалятся. ОК.
Процесс создания флешки.
Загружаем с только что созданной нами загрузочной флешки ноутбук Acer Aspire
В БИОСе опцию Secure Boot отключать не нужно, так как у нас UEFI флешка. При загрузке ноутбука жмём F12
и входим в загрузочное меню, выбираем в нём нашу флешку.
Загружается Live CD AOMEI PE Builder.
Жмём Enter на клавиатуре.
Загружается рабочий стол Live CD AOMEI PE Builder, представляющий из себя обычный Live CD на базе Windows 8.1. На рабочем столе можно увидеть интегрированную папку с программой WinNTSetup3.
Жмём на кнопку Windows Disk Management
Открывается управление дисками.
Видим скрытый раздел Recovery с заводскими настройками ноутбука (объём 16 ГБ), именно здесь находится сжатый файл образ install.wim с Windows 8.1.
и вы увидите, что данный раздел не виден в проводнике и в него невозможно войти.
Сделаем скрытый раздел восстановления Recovery видимым в проводнике.
Запускаем командную строку от имени администратора
и вводим команды:
sel vol 4 (4 номер скрытого раздела, у вас может быть другой. Я определяюсь по объёму 16 ГБ )
Теперь скрытый раздел восстановления Recovery имеет букву (F:), виден в проводнике и в него можно войти.
Входим в раздел, но нужной папки RecoveryImage с файлом образом install.wim мы не увидим,
чтобы их увидеть нужно в параметрах папок включить отображение скрытых файлов и папок. Щёлкаем левой мышью на View (Вид) и ставим галочку на пункте Hidden items (Скрытые элементы)
и появляется скрытая папка RecoveryImage (называться может по разному, зависит от производителя ноутбука).
Вкладка View. Отмечаем пункт Show hidden files, затем жмём Apply и ОК.
Снимаем галочку с пункта Hide protected operatingsystem files
После данных действий все скрытые папки и файлы будут видны в системе.
Часто изготовитель делит файл install.wim на несколько небольших файлов install.swm (в этом случае выберите самый первый).
Настала очередь программы WinNTSetup3
Заходим в личную папку программы
и запускаем файл WinNTSetup_x64.exe
В главном окне WinNTSetup нам нужно указать файл install.wim находящийся на разделе (F:) в папке RecoveryImage. Жмём Выбрать.
Находим в проводнике файл install.wim, выделяем его левой мышью и жмём Открыть.
Примечание : иногда производитель ноутбука делит файл install.wim на несколько файлов меньшего размера install.swm , в этом случае выбирайте самый первый.
Выбираем раздел, на который будет установлен загрузчик Windows 8.1, в большинстве случаев программа это делает автоматически выбирая первый раздел, System Reserved с файлами загрузки операционной системы и помечает его буквой Z.
Нам остаётся только выбрать диск, на который мы развернём Windows 8.1.
Это естественно будет диск (C:), выделяем его левой мышью и жмём кнопку Select Folder (кстати, можете развернуть заводскую Windows 8.1 и на другой раздел).
Диск (C:) нужно форматировать, иначе файл install.wim откажется разворачиваться.
Жмём на кнопку F.
Жмём на кнопку Установка.
Windows 8.1 восстанавливается из заводского образа.
Процесс успешно завершён. ОК.
Перезагрузка. Вынимаем флешку и загружаемся с жёсткого диска ноутбука, сразу входим в заключительную фазу инсталляции операционной системы (всё как при нормальном откате к заводским настройкам)
Региональные настройки выставляются автоматически.
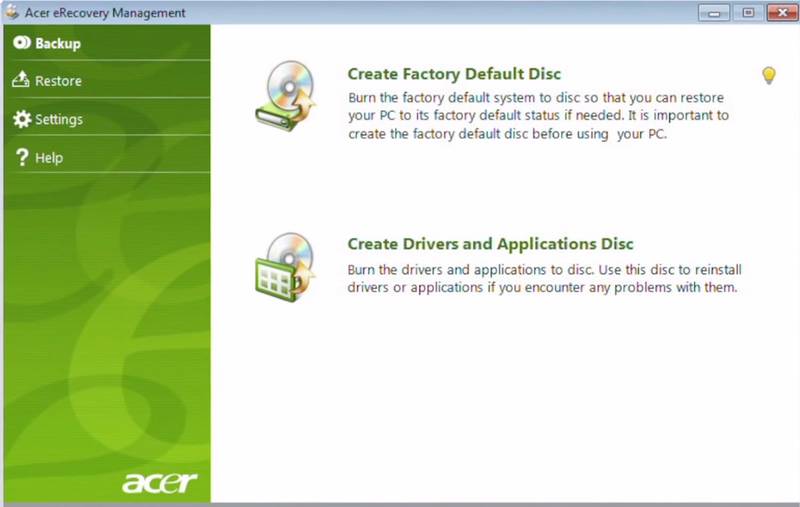
Modern Acer computers generally come with a partition that’s there to help you restore an Acer computer if it’s failed. That’s what the Acer eRecovery Management program is designed to access.
If you own an ACER laptop, then this program back backup your system and restore it. It can be for any reason, but users generally fire up Acer eRecovery Management after virus attacks, malware infection, data corruption or any other reason.
When you first buy an ACER computer, it’s generally recommended to create a backup file so that if anything ever does go wrong, you can use Acer eRecovery Management to manage the recovery process. You can only restore an ACER laptop to the point at which the last backup was run, so it’s advisable to run Acer eRecovery Management every now and then.
The interface of this data recovery software is quite easy-to-use and it guides you through the steps of backing up and recovering data.
When you decide to recovery from a previous backup point, you can reinstall the entire OS on your ACER machine, or if you choose, use Acer eRecovery Management to recover certain programs and drivers.
All in all, Acer eRecovery Management provides a number of tools useful for recovering an ACER laptop to peak performance by rewinding back to the last backup.
Acer eRecovery Management can perform backup operations, reinstall Windows and recover deleted files.
Acer eRecovery Management is licensed as Freeware for Windows (32-bit and 64-bit) operating system / platform from file recovery software without restrictions. Acer eRecovery Management 3.0.3014 is available to all software users as a free download (Freeware).
This system recovery software is filed under:
- Acer eRecovery Management Download
- Freeware File Recovery Software
- Major release: Acer eRecovery Management 3
- Free Software Download
Compatibility with this system recovery software may vary, but will generally run fine under Microsoft Windows 10, 8, 8.1, 7, Vista and XP on either a 32-bit or 64-bit setup. A separate x64 version may be available from Acer.
Acer eRecovery Management — это фирменное программное обеспечение для ноутбуков «Acer». Этот софт является инструментом, который восстанавливает «рабочее состояние» ноутбуков. Утилита не работает на обычных компьютерах, поэтому не пытайтесь её устанавливать на стационарные аппараты.
Acer eRecovery Management обеспечивает создание «бекапа», который хранит состояние OS Windows и восстанавливает его в будущем.
В программе отсутствует русский язык. Все инструменты и функции интерфейса подходят для неопытных пользователей. Для управления утилитой вам помогает «пошаговый мастер», который показывает инструкции и советы. Вы легко освоите программное обеспечение и создадите резервную копию настроек операционной системы.
В этом софте есть несколько способов для создания «копий» и «бекапов» системы. Вы можете выбрать подходящий вариант и сохранить конфиги, используя разные способы.
Используя Acer Management, вы сохраните «бекап данных», не потеряв настройки OSWindows. В утилите вы без проблем восстановите систему до «текущей точки», вернувшись на начальные настройки.
Воспользуйтесь одним из двух режимов и создайте «архивную копию» OS Windows. Вы можете создать конфигурационный файл для быстрого «отката» в нужное состояние, используя «полный» и «постепенный» режим настройки.
Используя полный режим, вы заново сохраняете все настройки системы, не смотря на резервную копию данных, которая была создана раньше. Этот способ не всегда эффективный, ведь «бэкап» системы может быть не сильно изменен.
Если вы нечасто делаете восстановление системы, то воспользуйтесь «постепенным режимом, избегая перезаписи данных. Вы не только сэкономите время, но создадите новый «бэкап», используя предыдущий «конфиг», а также добавив все изменения, которые сделаны ранее. Эта утилита не работает на новых сборках OS Windows. Устанавливайте это программное обеспечение на OS Windows XP и до «семерки».

Acer offers a number of free Recovery Management Tools to help you detect and fix any problems with your computer. Among the tools offered are their Care Center, which provides information about the hardware and software on your system, and their eRecovery Media software, which can be used to restore your system to its factory default.
This article will introduce you to some of the Acer support tools available to you so that you can find the one that’s right for your situation.
The Acer Care Center can be used to find any information pertaining to your system information, hardware diagnostic tools, and software updates.
To download the software, head to the official Care Center page and click Check Compatibility. The download will automatically begin.
Once downloaded, you can access the software from your Start screen by searching for Care Center and then double-clicking the program to launch it.
The Acer Recovery Management software can be downloaded from Acer’s official site.
Simply head to the page, and choose the appropriate software version. You will be presented with a variety of articles and solutions to help you recover your system.
The Acer eRecovery Media software can be used to restore your system to its original factory settings. This includes all software, applications, drivers, and Operating Systems.
To get started, head to the site and enter the SNID (or serial number) or your Acer laptop into the text field. Then, hit Submit. If you can’t locate your SNID, you can download Acer’s System Information Tool to help you find it.
Still having problems? Go to the Acer Service and Support site, input the make and model of your computer, and then click Search to find articles specifically related to your problem.
A simple-to-configure piece of software developed specifically for ACER laptop users in order to help them create backup files and restore the system
Acer eRecovery Management is a practical application designed to help you back up your system. The created backup files can be used to restore the system to a previous state with minimum effort.
This tool is designed for the ACER laptop users that want to recover their information after a virus attack or a system crash. You can also use it to create periodical backups if you want to make sure that you are able to restore the computer to a certain state.
It is recommended that you create the recovery discs when you use the computer for the first time or when your frequently used applications are installed on it. Since the recovery discs enable you to restore the computer to the moment of creating them, it makes sense to back up the computer when everything is working fine.
The interface of the program is easy to use and guides you through all the required steps. You just need to start the program and choose the operation that you want to perform. Whether you need to back up or restore the computer the options are clearly explained in the main window.
When restoring your computer you can choose from completely reinstalling the entire operating system or reinstalling only certain applications and drivers that you are having problems with. This allows you to minimize the modifications and the time spent with the recovery.
Before starting the system recovery, make sure that your data is backed up on a disk or a separate partition. You have the option of preserving the content of the user account folder, but all other folders are deleted in the recovery process.
Overall, the application provides you with the basic features required to restore your computer or certain applications to a functional state without having to manually set up the operating system.
Программы » Windows » Windows 7 » Диск восстановления системы ноутбука Acer Aspire 6935G Windows Vsta Premium x86 [Ru]

Диск восстановления системы ноутбука Acer Aspire 6935G Windows Vsta Premium x86 [Ru] скачать торрент
Описание:
Оригинальный диск к ноутбуку Acer Aspire 6935G с драйверами для Windows Vsta Premium x86
Образы 3 дисков для восстановления заводской установки операционной системы. Образы 2 DVD дисков — с самой системой, один — с драйверами (AppDrv).
Диск AppDrv служит для восстановления драйверов аппаратного обеспечения установленного на ноутбуке заводом производителем.
Диски созданы утилитой идущей вместе с ноутбуком, и нужны если по каким то причинам не работает и не помогает восстановление с раздела рекавери по клавишам Alt+F10
AppDrv:
MD5: 381501b5a76368b8d2ddda6a8b31e9e6
Состав диска AppDrv
Софт:
Acer Mobility Center add-on
Adobe Flash Player
Adobe Reader
Arcade Deluxe
eAudio Management
eDataSecurity Management
Empowering Technology Framework
ePower Management
eRecovery Management
eSettings Management
eSobi
GridVista
NTI Media Maker
Orion
Power Director (trial)
VCM (H264)
Драйвера:
ABIG Finger Print BioProtection_Validity
Atheros Lan AR8121
Avermedia TV Tuner DVB-T Mini-card A309
Avermedia TV Tuner DVB-T Mini-card A310
Bison Camera utility Crystal Eye
Dritek Launch Manager
Foxconn Bluetooth BT 2.0
Foxconn Modem T60M951
Foxconn Modem T60M955
Intel AHCI
Intel Chipset GM975
Intel VGA Chip GM975
Intel WiFi 5100 5300
ITE MIR IT8512E
nVidia VGA Chip NB 9PGSHMM 9PGSHM
Realtek Audio Codec ALC889
Silion App. Cardbus1 JMB385
Suyin Camera utility 0.3M Crystal Eye
Suyin Camera utility 1.0M Crystal Eye
Synaptics Touchpad
Дополнительная информация:
Из соседней ветки (сам не пробовал)
Скачав и проделав восстановление системы, сообщаю всем нуждающимся доп. информацию:
1) Необходимо перенести файлы которые Вам нужно на другой носитель (смотри п.3);
2) Полученные образы (Recovery 1,2.iso) с данной раздачи записывайте на DVD-R (RW) при помощи Nero, UltraISO и т.д;
3) Разнообразными программами (Acronis Disk Director Suite, Paragon и т.д.) уничтожить все разделы на HDD диска ноута. В противном случае при запуске первого же диска на этапе установки Вам отобразиться надпись с информацией о нехватке места на носителе, и при нажатии кнопки ОК ноут попросту перезагрузиться;
4) Время восстановление примерно — 2-3 часа;
5) Данный пункт по желанию: Произвести пере-активацию (ввести cd-key) под Вашу OEM лицензию, которая расположена на обратной стороне Вашего Acer;
6) Загрузите/установите все необходимые обновления в центре управление;
7) Удалите всё лишнее ПО, установите необходимое ПО и говорите спасибо автору раздачи.
В итоге Вы получаете: Полноценную версию OS Windows Vista которая шла вместе с Вашим ноутбуком, со всем драйверами и обновлениями.
П.С. Для тех у кто решил HDD сменить на SSD накопитель (как в моём случае), рекомендую предварительно все выше перечисленные пункты произвести на HDD, затем программными средствами, такими как, GHOST, Acronis True Image и т.д. снять образ всего диска и перенести нас SSD. Тем самым, избежав многократной перезаписи, Вы увеличите его срок службы и работы.
Introduction to Acer Erecovery Management Application
This article will give a brief introduction to Acer provided operating system restoration software — Acer eRecovery Management.
An easy-to-use and versatile tool offers data backup, files sync, disaster recovery, and disk clone solutions.
Files Backup
Backup multiple files automatically to local, external or network storages.
System Backup
One-click back up Windows, settings, applications and boot files.
Disk Backup
Backup internal disks, external drives, USB flash drives and other storage devices.
Schedule Backup
Set a schedule to automatically backup system or data daily, weekly or monthly.
Incremental Backup
Backup only changed or new parts based on full backup to save time and storage.
I wish to inform you that Backupper is the best software I have used previously. Thank you so much for this free backup software.
I recently found your Windows system/data backup software-AOMEI Backupper- and I must say, this is by far the best I have tried in the last 6 months.
AOMEI Backupper is awesome. Its team solved ttough problem for me. I think it is a unique and personal software belonging to me.
What Is Acer eRecovery Management Software?
Acer eRecovery Management, also called Acer eRecovery Manager, is a software provided by the company to help users restore their Acer computers to default factory settings. All Acer desktops and notebooks come preloaded with a recovery partition to allow you to restore the operating system on your computer.
You can use Acer eRecovery Management software to create recovery media, reinstall Windows without using CDs or DVDs, or just reinstall drivers and applications. The Acer Recovery Management utility can restore a system to its last known good configuration which is saved as an image in a hidden partition in the hard disk of the computer system. The Acer Recovery Management utility can also recover the image of the good configuration from a secondary partition or an optical disk.
How to Get Acer eRecovery Management Application?
Acer eRecovery Management
The Acer Recovery Management utility is a free software tool that can be downloaded from the official Acer internet website. Simply go to this page and choose your location and follow the guidance to get the appropriate software version:
Acer eRecovery Media
Acer eRecovery Media is ready to quickly get your machine back to factory setting and give you a fresh start. Based on your model, you will be supplied a CD/DVD or Thumb Drive which restores your system to original factory settings including all software, applications, drivers and Operating System. Go here to get your own erecovery media:
Acer eRecovery Management Software Alternative
Besides Acer eRecovery Manager, you can also make use of AOMEI OneKey Recovery to restore your Acer computer back to factory default settings. AOMEI OneKey Recovery is a third party program developed by AOMEI Tech aiming at system backup and restore. With it, you can backup os to a hidden recovery partition on system disk, to other local disks or to external hard drives like USB flash device, Thumb drive, SanDisk, Pen Drive, etc. For backup images, you can compress and encrypt them before saving them to destination. Vice versa, you can restore your system to different states (factory defaults or a former good condition) from different image stored in different locations. Moreover, you can also choose to recover operating system to original place or other location according to your own special needs.
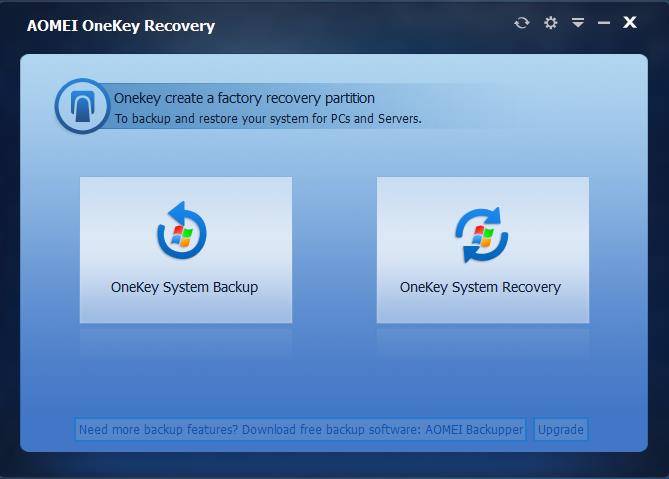
AOMEI OneKey Recovery is the best alternative to Acer eRecovery Management software. It not only supports Acer series products, but also can be applied to other brands machines, such as Lenovo, HP, Toshiba, Sony, Samsung, Asus, etc.
A way to uninstall Acer eRecovery Management from your PC
Acer eRecovery Management is a computer program. This page is comprised of details on how to uninstall it from your PC. The Windows version was created by Acer Incorporated . Take a look here for more details on Acer Incorporated. Click on www.acer.com to get more information about Acer eRecovery Management on Acer Incorporated’s website. Acer eRecovery Management is usually installed in the C:\Program Files\Acer\Acer eRecovery Management folder, however this location can differ a lot depending on the user’s decision when installing the application. C:\Program Files\InstallShield Installation Information\<7F811A54-5A09-4579-90E1-C93498E230D9>\setup.exe is the full command line if you want to remove Acer eRecovery Management. Recovery Management.exe is the Acer eRecovery Management’s primary executable file and it occupies close to 1.06 MB (1115544 bytes) on disk.
Acer eRecovery Management contains of the executables below. They occupy 3.10 MB ( 3248088 bytes) on disk.
- BootSect.exe (100.89 KB)
- CloseHandleW.exe (117.38 KB)
- ConfigTskSchler.exe (101.39 KB)
- eRecoveryMain.exe (185.38 KB)
- HidChk.exe (317.38 KB)
- Recovery Management.exe (1.06 MB)
- Recovery.exe (545.38 KB)
- WMIAcerCheck.exe (29.38 KB)
- Notification.exe (685.38 KB)
. click to view all.
The current page applies to Acer eRecovery Management version 5.00.3002 alone. For more Acer eRecovery Management versions please click below:
Folders found on disk after you uninstall Acer eRecovery Management from your computer:
- C:\Program Files\Acer\Acer eRecovery Management
Generally, the following files are left on disk:
- C:\Program Files\Acer\Acer eRecovery Management\bg\Recovery Management.resources.dll
- C:\Program Files\Acer\Acer eRecovery Management\bg\RecoveryLib.resources.dll
- C:\Program Files\Acer\Acer eRecovery Management\BOOT.DAT
- C:\Program Files\Acer\Acer eRecovery Management\BootSect.exe
- C:\Program Files\Acer\Acer eRecovery Management\CloseHandleW.exe
- C:\Program Files\Acer\Acer eRecovery Management\ConfigTskSchler.exe
- C:\Program Files\Acer\Acer eRecovery Management\cs\Recovery Management.resources.dll
- C:\Program Files\Acer\Acer eRecovery Management\cs\RecoveryLib.resources.dll
- C:\Program Files\Acer\Acer eRecovery Management\da\Recovery Management.resources.dll
- C:\Program Files\Acer\Acer eRecovery Management\da\RecoveryLib.resources.dll
- C:\Program Files\Acer\Acer eRecovery Management\de\Recovery Management.resources.dll
- C:\Program Files\Acer\Acer eRecovery Management\de\RecoveryLib.resources.dll
- C:\Program Files\Acer\Acer eRecovery Management\el\Recovery Management.resources.dll
- C:\Program Files\Acer\Acer eRecovery Management\el\RecoveryLib.resources.dll
- C:\Program Files\Acer\Acer eRecovery Management\eRecovery.ico
- C:\Program Files\Acer\Acer eRecovery Management\eRecoveryMain.exe
- C:\Program Files\Acer\Acer eRecovery Management\ERYBOOT.bin
- C:\Program Files\Acer\Acer eRecovery Management\eRyInfo.dat
- C:\Program Files\Acer\Acer eRecovery Management\es\Recovery Management.resources.dll
- C:\Program Files\Acer\Acer eRecovery Management\es\RecoveryLib.resources.dll
- C:\Program Files\Acer\Acer eRecovery Management\et\Recovery Management.resources.dll
- C:\Program Files\Acer\Acer eRecovery Management\et\RecoveryLib.resources.dll
- C:\Program Files\Acer\Acer eRecovery Management\FATBOOT.BIN
- C:\Program Files\Acer\Acer eRecovery Management\fi\Recovery Management.resources.dll
- C:\Program Files\Acer\Acer eRecovery Management\fi\RecoveryLib.resources.dll
- C:\Program Files\Acer\Acer eRecovery Management\fr\Recovery Management.resources.dll
- C:\Program Files\Acer\Acer eRecovery Management\fr\RecoveryLib.resources.dll
- C:\Program Files\Acer\Acer eRecovery Management\HelpFile_E\ERECOVERY.CHM
- C:\Program Files\Acer\Acer eRecovery Management\HelpFile_E\ERECOVERY-bg.CHM
- C:\Program Files\Acer\Acer eRecovery Management\HelpFile_E\ERECOVERY-cs.CHM
- C:\Program Files\Acer\Acer eRecovery Management\HelpFile_E\ERECOVERY-da.CHM
- C:\Program Files\Acer\Acer eRecovery Management\HelpFile_E\ERECOVERY-de.CHM
- C:\Program Files\Acer\Acer eRecovery Management\HelpFile_E\ERECOVERY-el.CHM
- C:\Program Files\Acer\Acer eRecovery Management\HelpFile_E\ERECOVERY-es.CHM
- C:\Program Files\Acer\Acer eRecovery Management\HelpFile_E\ERECOVERY-et.CHM
- C:\Program Files\Acer\Acer eRecovery Management\HelpFile_E\ERECOVERY-fi.CHM
- C:\Program Files\Acer\Acer eRecovery Management\HelpFile_E\ERECOVERY-fr.CHM
- C:\Program Files\Acer\Acer eRecovery Management\HelpFile_E\ERECOVERY-hr.CHM
- C:\Program Files\Acer\Acer eRecovery Management\HelpFile_E\ERECOVERY-hu.CHM
- C:\Program Files\Acer\Acer eRecovery Management\HelpFile_E\ERECOVERY-it.CHM
- C:\Program Files\Acer\Acer eRecovery Management\HelpFile_E\ERECOVERY-ja.CHM
- C:\Program Files\Acer\Acer eRecovery Management\HelpFile_E\ERECOVERY-ko.CHM
- C:\Program Files\Acer\Acer eRecovery Management\HelpFile_E\ERECOVERY-lt.CHM
- C:\Program Files\Acer\Acer eRecovery Management\HelpFile_E\ERECOVERY-lv.CHM
- C:\Program Files\Acer\Acer eRecovery Management\HelpFile_E\ERECOVERY-nl.CHM
- C:\Program Files\Acer\Acer eRecovery Management\HelpFile_E\ERECOVERY-no.CHM
- C:\Program Files\Acer\Acer eRecovery Management\HelpFile_E\ERECOVERY-pl.CHM
- C:\Program Files\Acer\Acer eRecovery Management\HelpFile_E\ERECOVERY-pt.CHM
- C:\Program Files\Acer\Acer eRecovery Management\HelpFile_E\ERECOVERY-ro.CHM
- C:\Program Files\Acer\Acer eRecovery Management\HelpFile_E\ERECOVERY-ru.CHM
- C:\Program Files\Acer\Acer eRecovery Management\HelpFile_E\ERECOVERY-sk.CHM
- C:\Program Files\Acer\Acer eRecovery Management\HelpFile_E\ERECOVERY-sl.CHM
- C:\Program Files\Acer\Acer eRecovery Management\HelpFile_E\ERECOVERY-sv.CHM
- C:\Program Files\Acer\Acer eRecovery Management\HelpFile_E\ERECOVERY-tr.CHM
- C:\Program Files\Acer\Acer eRecovery Management\HelpFile_E\ERECOVERY-zh-CHS.CHM
- C:\Program Files\Acer\Acer eRecovery Management\HelpFile_E\ERECOVERY-zh-CHT.CHM
- C:\Program Files\Acer\Acer eRecovery Management\HelpFile_F\ERECOVERY.CHM
- C:\Program Files\Acer\Acer eRecovery Management\HelpFile_F\ERECOVERY-bg.CHM
- C:\Program Files\Acer\Acer eRecovery Management\HelpFile_F\ERECOVERY-cs.CHM
- C:\Program Files\Acer\Acer eRecovery Management\HelpFile_F\ERECOVERY-da.CHM
- C:\Program Files\Acer\Acer eRecovery Management\HelpFile_F\ERECOVERY-de.CHM
- C:\Program Files\Acer\Acer eRecovery Management\HelpFile_F\ERECOVERY-el.CHM
- C:\Program Files\Acer\Acer eRecovery Management\HelpFile_F\ERECOVERY-es.CHM
- C:\Program Files\Acer\Acer eRecovery Management\HelpFile_F\ERECOVERY-et.CHM
- C:\Program Files\Acer\Acer eRecovery Management\HelpFile_F\ERECOVERY-fi.CHM
- C:\Program Files\Acer\Acer eRecovery Management\HelpFile_F\ERECOVERY-fr.CHM
- C:\Program Files\Acer\Acer eRecovery Management\HelpFile_F\ERECOVERY-hr.CHM
- C:\Program Files\Acer\Acer eRecovery Management\HelpFile_F\ERECOVERY-hu.CHM
- C:\Program Files\Acer\Acer eRecovery Management\HelpFile_F\ERECOVERY-it.CHM
- C:\Program Files\Acer\Acer eRecovery Management\HelpFile_F\ERECOVERY-ja.CHM
- C:\Program Files\Acer\Acer eRecovery Management\HelpFile_F\ERECOVERY-ko.CHM
- C:\Program Files\Acer\Acer eRecovery Management\HelpFile_F\ERECOVERY-lt.CHM
- C:\Program Files\Acer\Acer eRecovery Management\HelpFile_F\ERECOVERY-lv.CHM
- C:\Program Files\Acer\Acer eRecovery Management\HelpFile_F\ERECOVERY-nl.CHM
- C:\Program Files\Acer\Acer eRecovery Management\HelpFile_F\ERECOVERY-no.CHM
- C:\Program Files\Acer\Acer eRecovery Management\HelpFile_F\ERECOVERY-pl.CHM
- C:\Program Files\Acer\Acer eRecovery Management\HelpFile_F\ERECOVERY-pt.CHM
- C:\Program Files\Acer\Acer eRecovery Management\HelpFile_F\ERECOVERY-ro.CHM
- C:\Program Files\Acer\Acer eRecovery Management\HelpFile_F\ERECOVERY-ru.CHM
- C:\Program Files\Acer\Acer eRecovery Management\HelpFile_F\ERECOVERY-sk.CHM
- C:\Program Files\Acer\Acer eRecovery Management\HelpFile_F\ERECOVERY-sl.CHM
- C:\Program Files\Acer\Acer eRecovery Management\HelpFile_F\ERECOVERY-sv.CHM
- C:\Program Files\Acer\Acer eRecovery Management\HelpFile_F\ERECOVERY-tr.CHM
- C:\Program Files\Acer\Acer eRecovery Management\HelpFile_F\ERECOVERY-zh-CHS.CHM
- C:\Program Files\Acer\Acer eRecovery Management\HelpFile_F\ERECOVERY-zh-CHT.CHM
- C:\Program Files\Acer\Acer eRecovery Management\HelpFile_G\ERECOVERY.CHM
- C:\Program Files\Acer\Acer eRecovery Management\HelpFile_G\ERECOVERY-bg.CHM
- C:\Program Files\Acer\Acer eRecovery Management\HelpFile_G\ERECOVERY-cs.CHM
- C:\Program Files\Acer\Acer eRecovery Management\HelpFile_G\ERECOVERY-da.CHM
- C:\Program Files\Acer\Acer eRecovery Management\HelpFile_G\ERECOVERY-de.CHM
- C:\Program Files\Acer\Acer eRecovery Management\HelpFile_G\ERECOVERY-el.CHM
- C:\Program Files\Acer\Acer eRecovery Management\HelpFile_G\ERECOVERY-es.CHM
- C:\Program Files\Acer\Acer eRecovery Management\HelpFile_G\ERECOVERY-et.CHM
- C:\Program Files\Acer\Acer eRecovery Management\HelpFile_G\ERECOVERY-fi.CHM
- C:\Program Files\Acer\Acer eRecovery Management\HelpFile_G\ERECOVERY-fr.CHM
- C:\Program Files\Acer\Acer eRecovery Management\HelpFile_G\ERECOVERY-hr.CHM
- C:\Program Files\Acer\Acer eRecovery Management\HelpFile_G\ERECOVERY-hu.CHM
- C:\Program Files\Acer\Acer eRecovery Management\HelpFile_G\ERECOVERY-it.CHM
- C:\Program Files\Acer\Acer eRecovery Management\HelpFile_G\ERECOVERY-ja.CHM
- C:\Program Files\Acer\Acer eRecovery Management\HelpFile_G\ERECOVERY-ko.CHM
Registry keys:
- HKEY_LOCAL_MACHINE\Software\Acer Incorporated\Acer eRecovery Management
- HKEY_LOCAL_MACHINE\Software\Microsoft\Windows\CurrentVersion\Uninstall\
How to uninstall Acer eRecovery Management using Advanced Uninstaller PRO
Acer eRecovery Management is an application marketed by Acer Incorporated. Sometimes, people decide to uninstall this application. This can be troublesome because uninstalling this manually requires some experience related to Windows internal functioning. One of the best EASY procedure to uninstall Acer eRecovery Management is to use Advanced Uninstaller PRO. Here is how to do this:
1. If you don’t have Advanced Uninstaller PRO already installed on your Windows system, install it. This is a good step because Advanced Uninstaller PRO is a very efficient uninstaller and all around tool to take care of your Windows system.
- navigate to
- download the setup by pressing the green DOWNLOAD NOW button
- install Advanced Uninstaller PRO
2. Start Advanced Uninstaller PRO. It’s recommended to take some time to admire Advanced Uninstaller PRO’s design and number of features available. Advanced Uninstaller PRO is a very good package of utilities.
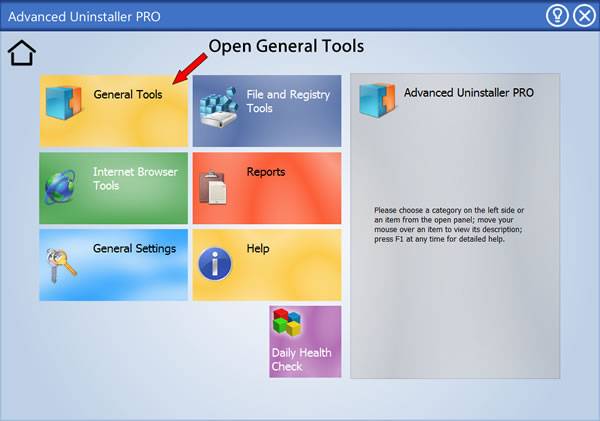
3. Click on the General Tools button
4. Press the Uninstall Programs tool
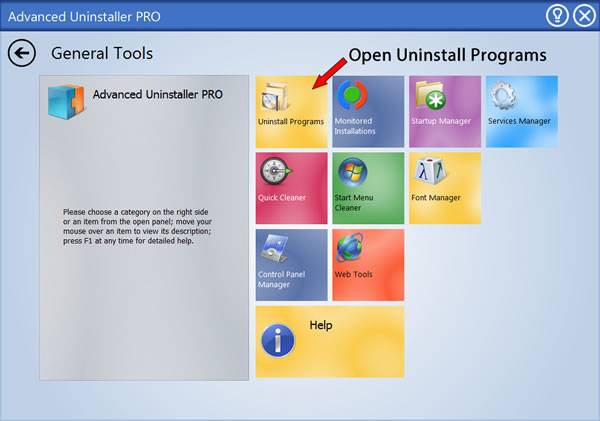
5. A list of the applications installed on the PC will be made available to you
6. Scroll the list of applications until you locate Acer eRecovery Management or simply activate the Search feature and type in «Acer eRecovery Management». The Acer eRecovery Management application will be found automatically. When you select Acer eRecovery Management in the list of programs, some information regarding the program is made available to you:
- Safety rating (in the lower left corner). This explains the opinion other users have regarding Acer eRecovery Management, from «Highly recommended» to «Very dangerous».
- Opinions by other users — Click on the Read reviews button.
- Details regarding the application you want to uninstall, by pressing the Properties button.
For example you can see that for Acer eRecovery Management:
- The publisher is: www.acer.com
- The uninstall string is: C:\Program Files\InstallShield Installation Information\<7F811A54-5A09-4579-90E1-C93498E230D9>\setup.exe
7. Click the Uninstall button. A confirmation window will appear. accept the removal by pressing Uninstall. Advanced Uninstaller PRO will remove Acer eRecovery Management. 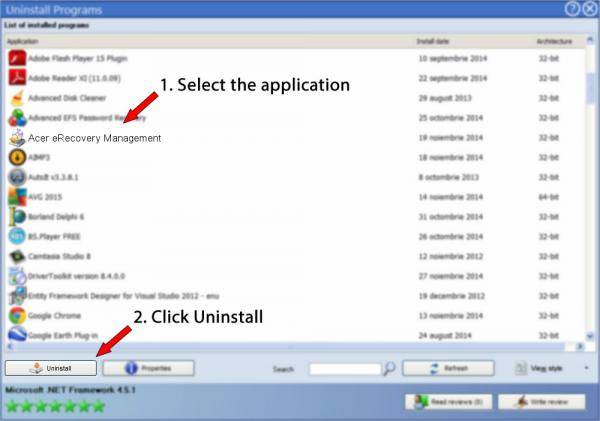
8. After removing Acer eRecovery Management, Advanced Uninstaller PRO will ask you to run an additional cleanup. Click Next to perform the cleanup. All the items that belong Acer eRecovery Management that have been left behind will be found and you will be asked if you want to delete them. By removing Acer eRecovery Management using Advanced Uninstaller PRO, you can be sure that no registry items, files or directories are left behind on your PC.
Your PC will remain clean, speedy and ready to run without errors or problems.
1 1 Acer erecovery Management Developed by Acer’s software team, Acer erecovery Management is a tool that provides you with an easy, reliable and safe means of restoring your computer to its factory default state from an image stored in a hidden partition on the computer’s hard disk drive. Acer erecovery Management also provides you with an easy-to-use facility to back up your system and data as an image stored on the hard disk drive, or to optical disks. Using Acer erecovery Management You can launch Acer erecovery Management in a number of ways: By pressing the hotkey + during the boot-up process, or at any time when you are running Microsoft Windows. From the Start menu, go to Start > (All) Programs > Empowering Technology > Acer erecovery Management. By clicking on the Empowering Technology icon from your desktop, or pressing the key to launch the Empowering Technology user interface. Select the Acer erecovery Management icon. This will open the Acer erecovery Management main page.
2 2 Using the user interface Acer erecovery Management uses an intuitive user interface to guide you through the various backup and recovery processes. This UI is detailed below. Password Acer erecovery Management requires a password to activate. The default password is six zeros (0s). Reminder to burn factory image to disk The first time you use Acer erecovery Management, you are reminded to burn the factory image (from the hidden partition) to an optical disk. Once the disks have been burned, or if you have checked the checkbox in the lower left-hand corner of the screen, the reminder is no longer shown.
3 3 Create backup image You can create a backup image of the current system configuration (applications, drivers and data). It would be a good idea to create a backup on a regular basis to protect your system and data, or before installing new hardware or software. There are two choices once you click on Recovery settings.
4 4 Backup to HDD The image is saved to the system’s secondary partition (by default the D:\ drive). If there is insufficient space on the secondary partition, the option will be grayed out and a warning will be displayed. Backing up to the HDD ensures that you will always be able to recover your system if necessary, without the need for optical disks. Step 1: Click on Backup snapshot image: Create a disk image of your system s current configuration. Step 2: The UI will prompt you to enter a description for the backup.
5 5 Step 3: The backup information is displayed. Step 4: You are reminded to close all applications, and you are requested to confirm and reconfirm the backup. Step 5: The system reboots to DOS and the image creation process starts.
6 6 Step 6: Once the backup is finished, or if the backup fails, a message is displayed. Backup to optical disk The image is saved to an optical disk. Acer erecovery Management is able to span multiple disks if needed. Backing up to optical disk means that your data will always be available on disks, in the event of a hard disk failure. Step 1: Click on Backup to optical drive:, and enter a description for the backup.
7 7 Step 2: The backup information is displayed, and you are requested to confirm the backup. Step 3: You are reminded to close all applications and reconfirm the backup. Step 4: The system reboots to DOS and the image is created on the HDD. Step 5: Once the image is created, Windows starts, and then the burning process begins. The keyboard and mouse are disabled during the burning process to ensure system stability.
8 8 Burn an image to optical disk Step 1: Click on Burn image to disk: Create Backup disk. Step 2: You can select to burn any image stored on the HDD (including the factory default image stored in the hidden partition) to an optical disk.
9 9 Step 3: The backup information is displayed, and you are requested to confirm the backup. Step 4: As each disk is filled, Acer erecovery Management prompts you to insert the next blank disk. Step 5: You are reminded to label each disk in sequence appropriately. Step 6: Once the burning process starts, the keyboard and mouse are disabled to ensure system stability. Step 7: Once the backup is finished, or if the backup fails, a message is displayed.
10 10 Delete user-created backup image You have the option of deleting the user-created backup image to free-up disk space on the HDD. Once you have selected this option, you are reminded that the operation cannot be undone, and are asked to confirm.
11 11 Password Each time Acer erecovery Management is started, it will prompt for a password if one has been set. The default password is six zeros (0s). A prompt appears in the lower left-hand corner of the screen when the default password is used. Once you have changed the password, the prompt disappears. Note: If an incorrect password is entered three times, Acer erecovery Management closes and returns to Windows automatically. To change the password Step 1: You may change the default password by selecting Password: Change erecovery Password from the main page.
12 12 Step 2: You are asked to enter the new password twice. The new password can have a maximum length of eight characters. Step 3: If the two passwords do not match, you are prompted to try again. Once the password has been changed, you are informed.
13 13 System recovery Step 1: Click on Recovery actions. Step 2: You are presented with a list of available options. Restore factory default image By selecting to restore the factory default image, you will restore your computer to its original state. All your data and any programs installed by you will be lost. Once you have confirmed that you wish to proceed, the computer will reboot and start to restore the system from the image contained in the hidden partition.
14 14 Restore C: from user backup image function Should you choose this option, you will be able to restore to the most recent image you created. The image information will be displayed below the option. This option is only available if the image is stored on a drive that is formatted using the FAT32 file system. If no image is available (either the partition has been converted to NTFS, or you have not created an image), the option is grayed out. Recover system from CD/DVD backup If you choose to restore from an image on an optical disk, the BIOS will be changed to boot from the optical drive. If no backup disk is found, you are prompted to insert the disk. Reinstall applications or drivers If an application or driver has been damaged, you may choose to reinstall it. Acer erecovery Management will need to extract the data from the hidden partition. This process may take some time, and the keyboard and mouse will be disabled during the process to ensure system stability. Once the data has been extracted, you will see the TravleMate/Aspire/Extensa Series System CD autorun page.
16 16 Restoring the system from optical disks You will be asked to insert the first backup disk. Acer erecovery Management will confirm that you want to restore the system. You are reminded that all the data on C:\ will be lost and are asked to reconfirm that you wish to restore the system. The process will begin. You are prompted to insert the other disks as necessary. If you are recovering to the factory default image that has been burnt to a disk, Acer erecovery Management will ask you to insert disk 2 to start. If you are using a user-created image, you will be prompted to insert the disks as necessary. Changing the password To change the password, you are requested to enter the new password twice. If the change is successful, a message is shown. If the change is unsuccessful (because the two passwords entered don’t match) you are asked if you want to try again. Restoring the system using a bootable optical disk You can select to restore your system from a bootable optical disk created previously. You will need to adjust your BIOS settings to boot from the optical drive first, and insert the first disk before rebooting your system. Using a disk with the factory default image After rebooting, Acer erecovery Management will confirm that you want to restore your system. The backup image information will be shown. You are required to double-confirm the recovery. You are prompted to insert disk 2. Once you click «OK,» the process will start. You are prompted to insert disk 1 again at the end of the process. A progress bar shows the status if you are restoring from the factory default image. Once the recovery is completed, you are informed.
17 17 Using a disk with a user-created backup image After rebooting, Acer erecovery Management will confirm that you want to restore your system. The backup image information will be shown. You are required to double-confirm the recovery. You are prompted to insert the first disk. Once you click «OK,» the process will start. You are prompted to insert the next disks as required. Once the recovery is completed, you are informed.
Acer eRecovery Management is an application that will enable you to create backups of your current system configuration and use them in case you have to restore the system.The backup image can be created on an optical disc as well as on a secondary or hidden partition of your HDD.
License: Shareware | Price: $0.00 | Downloads (619)
Platform: Windows XP , Vista, 7
All-in-one suite to completely protect, maintain and manage your PC! Hard Disk Manager Suite provides you with all of the tools you need to manage today’s hard drives, including partitioning, backup & restore, migration, optimization &.
All-in-one suite to completely protect, maintain and manage your PC! Hard Disk Manager Professional provides you with all of the tools you need to manage today’s hard drives, including partitioning, backup & restore, migration, optimization &.
At present, many users suffer from data loss problem because there are so many corruption reasons are being continued existence. To restore system state from backup, get BKF Recovery tool that can easily restore backup Exec BKF file. If any question.
If you are concerned to BKF file devastation. Don’t be anxious! Because SysTools provides a key for your corrupt BKF file. SysTools BKF Repair Tool is developed highly user friendly software that make your work easy and better. BKF Recovery Utility.
Are you searching for the solution that how to restore NTBackup? SysTools BKF repair tool is best tool to restore computer backup file. If you have created the backup file for your Windows system and your system restore backup tool is prompting error.
Find out the best tool that gives you reliable answer for your queries like how to restore backup exec files. In online market, you have seen several options to recover Symantec backup or restore backup exec files but you need to select best option.
When you feel that you are nearby at heavy loss and looking for an excellent way to restore backup files then you can choose SysTools BKF Repair tool that gives you reliable results with 100% backup recovery. In new edition of SysTools BKF Repair tool.
Choose an alternative to restore backup exec data at SysTools that will give you full satisfaction with complete recovery results. You can repair and restore up to 300 GB data in one time without losing any single file. Those backup files which are.
Appreciated tool to recover any type of corrupt BKF files is SysTools BKF Repair Software also known for finest data recovery services. Immediately you can solve any type of corruption issue using this stellar tool. This tool has many beneficial.
Hard Disk Manager Suite will provide you with all of the tools you need to manage today’s hard drives, including partitioning, backup & restore, migration, optimization & defragmentation, hard drive disposal, boot management and system.
В статье использованы материалы:
http://remontcompa.ru/730-kak-vernut…rabotaet.html
http://acer-erecovery-management.en.lo4d.com/
http://softdroids.com/372-acer-erecovery-management.html
http://ccm.net/faq/15721-acer-recovery-management-tools
http://www.softpedia.com/get/System/Back-Up-and-Recovery/Acer-eRecovery-Management.shtml
http://www.backup-utility.com/okr/acer-erecovery-management-software-1234.html
http://docplayer.net/7811149-Acer-erecovery-management.html
http://www.filebuzz.com/fileinfo/345142/Acer_eRecovery_Management.html
Оставить комментарий